
VIDEO, SOUND, & MUSIC PRODUCTION
A CENTRAL MONTCO TECHNICAL HIGH SCHOOL PROGRAM
INTRO TO PHOTOSHOP
SUMMARY
Out of all the programs Adobe makes, one of the most important (if not the most important) is Photoshop.
This program has set the standard for image enhancement and manipulation for 25+ years and it is an essential tool for every artist and designer. For this project, we are going to cover the basics of Photoshop including how to set up, alter and save image files into various image formats. Once you learn the basics, you can utilize this tool to improve all of your videos, photos, and designs.
PART ONE - SAVING FILES & IMAGE ADJUSTMENTS
START HERE - PHOTOSHOP SHORTCUT CHEAT SHEET
CLICK ON IMAGE TO DOWNLOAD

PART ONE - SAVING FILES & IMAGE ADJUSTMENTS


DOWNLOAD THE PRACTICE IMAGES & CORRECT THEM
Take the images provided by the website and color-correct them. Use what you've learned from the class lectures to make the necessary adjustments to improve them. Once completed then, make a collage using Photoshop and upload them to this assignment. Your collage needs to be:
-
Download the Practice Images .zip file to download your images
-
Use the Photoshop color correction tools for your images
-
Levels
-
Brightness/Contrast
-
Color Balance
-
Levels
-
Curves
-
Hue/Saturation
-
-
Take your corrected images and make a collage.
-
Do not add the originals
-
See the image on the right as an example of your finished collage to upload
-
-
Size11"X17" @ 150dpi Horizontal or Vertical
-
Flattened and saved as a JPEG


SETTING UP PHOTOSHOP
PART TWO - FILTER COLLAGE
Taking what you've learned about creating new documents and making layers, you are going to create a photo collage using the Adobe Photoshop "Filter Gallery" feature.
INSTRUCTIONS
-
You need a MINIMUM of 5 images from your phone, NOT Google.
-
They must also be school appropriate
-
The image can be Horizontal OR Vertical
-
You could do a theme
-
Landscapes
-
animals
-
people
-
food
-
or 1 of each type, it's up tp you
-
-
You need to run a filter on each image using the filter gallery
-
The filters should complement each other
-
The image needs to be 8.5" x 11" @ 150 DPI
-
The final Collage images need to have white space between them
-
Flatten and save as a JPEG
-
See the image to the right for an example

PART THREE - WORKING WITH LAYERS - FRUIT BOWL
INSTRUCTIONS
Taking what you've learned about creating and working with Layers, download the files below to create a bowl of fruit
-
Create a new document that's 8.5"x11" @ 150 DPI
-
Download then paste all of the files below to create your fruit bowl
-
Use the selection tools covered in the lectures to take out the white backgrounds
-
Organize the layers to place the images in front and behind one another
-
Make sure the fruits are the correct sizes in comparison to one another
-
Save your layered file (.PSD) to your Master Folder
-
Flatten and save as a JPEG
-
Upload to Schoology
PROJECT FILES - CLICK ON THEM TO DOWNLOAD


PART FOUR - DESIGN YOUR OWN SHOE
INSTRUCTIONS
Continuing on with layers, take the Nike Air Force 1 template and create your own Custom Shoe
-
Create a new document that's 8.5"x11" @ 150 DPI
-
Download the shoe template to begin your design
-
Come up with a theme for your shoe: sports, video games, outer space, movies, music, patterns, etc.
-
Collect high-quality images from Google for your design
-
Use the selection tools covered in the lectures to select the pieces within the shoe
-
Paste your images into the shoe pieces to create your design
-
Save your layered file (.PSD) to your Master Folder
-
Flatten and save as a JPEG
-
Upload to Schoology

PART FIVE - POP ART PORTRAIT
Let's apply that knowledge in a fun and personal setting. In this project, you are going to paint several renditions of a picture of yourself and arrange it in a grid. A famous artist that used this technique to develop pop art advertising is Andy Warhol. We are going to mimic this technique to create an original, personal piece of art.
First, you will use your Smartphone to take your picture. Once you take the picture you will have to email it to yourself so you can work on it on your computer. Be creative with your pose so your project will be appealing and interesting! You will apply a filter inside Photoshop to make it look like a black-and-white sketch, then use your selection and coloring techniques to create the Warhol effect. Remember to use bright colors!
WHO IS ANDY WAHOL AND WHAT IS "POP ART"?


1. Using the studio cameras, pick a partner and take a photograph of yourself with an interesting pose that matches the pop art theme. USE THE GREEN SCREEN IN THE PHOTO STUDIO Be creative! The more interesting the picture the better the final product.
2. Create a new document sized 8"x8" @ 150 DPI
3. "Copy and Paste" your Selfie into this new document to create your portrait
4. Create multiple layers of the same image as you will need at least 4 copies for your final layout
5. Use the "Threshold" feature in Photoshop under the "Image-Adjustments" dropdown) to give your image a photocopied look
6. Using your selections tools, select different portions of the images and fill them with bright colors (which were used heavily in Pop Art)
7. Try not to use more than 4 colors for your portrait. Too many will become distracting
8. Once all four images have been created, space them out evenly to create a finished Pop Art piece like the image to the right
9. Save your final piece as a PSD file
10. Flatten your image and save it as a JPEG. Save both to your Master folder
11. Upload the JPEG to Schoology

INSTRUCTIONS
POP ART TUTORIALS
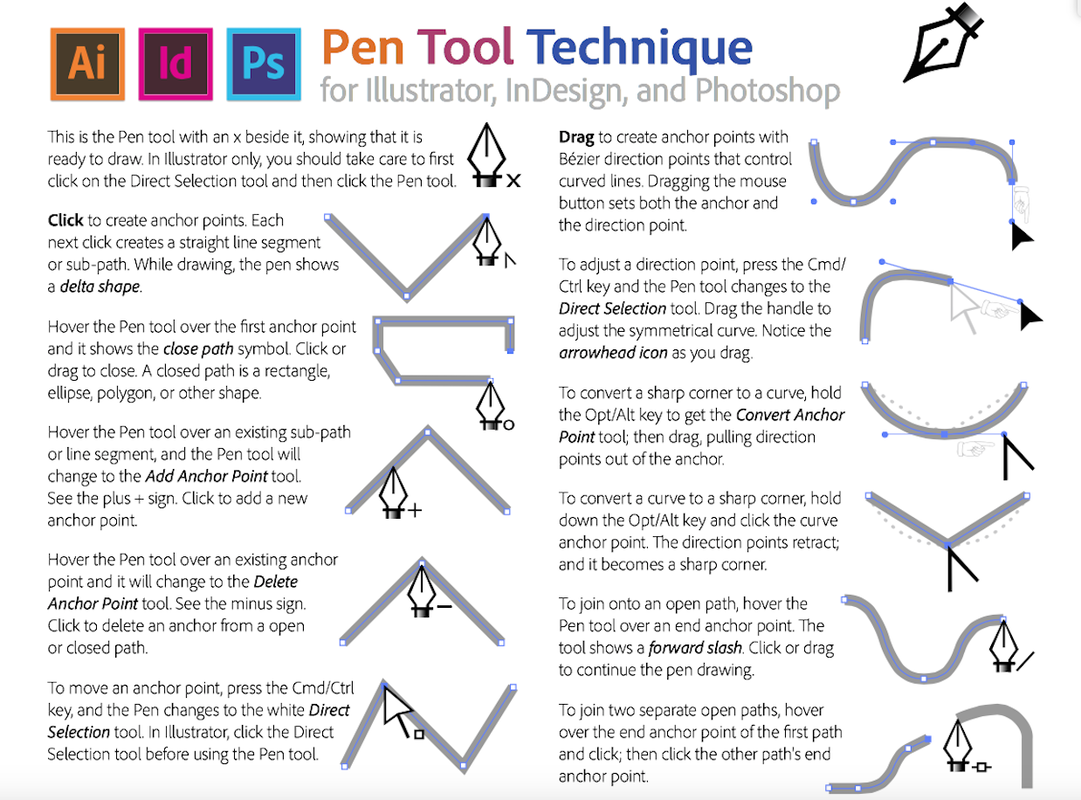
PART SIX - USING THE PEN TOOL
INSTRUCTIONS
One of the most important skills needed in Photoshop is the ability to trace items with precision. Taking what you've learned in the lectures, use the Pen tool to trace out the items and create Clipping Paths. Then take the traces out images and put them together in a collage.
-
Download the images below to begin your project
-
Using the pen tool, take the images and remove them from their backgrounds
-
Paste the new traced-out images and place them all in the 11"X17" document
-
Save your layered file (.PSD) to your Master Folder
-
Flatten and save as a JPEG
-
Upload to Schoology
PROJECT FILES - CLICK ON THEM TO DOWNLOAD


FINISHED STUDENT EXAMPLES


ADDITIONAL RESOURCES
Then Watch this Video...
Then Play the Pen Tool Game!

RESOURCES


Guides and Cheat Sheets


OVERVIEW
Abode Photoshop has long been considered the industry-standard image editing program is an essential tool for every designer's toolkit. From photography to graphic, video, and web design, photoshop has an endless amount of practical uses to create and promote any image you bring into it.
OBJECTIVE
To understand and demonstrate the ability to use Adobe Photoshop by creating edited images for use in marketing materials.
PROGRAM TASKS COVERED
201 Use graphic software to create, format, and edit documents.
202 Change application settings and manage files within a graphic software application.
203 Prepare files for appropriate output.
207 Use a bitmap-based application.