
VIDEO, SOUND, & MUSIC PRODUCTION
A CENTRAL MONTCO TECHNICAL HIGH SCHOOL PROGRAM
EXPLORATORY ASSIGNMENTS
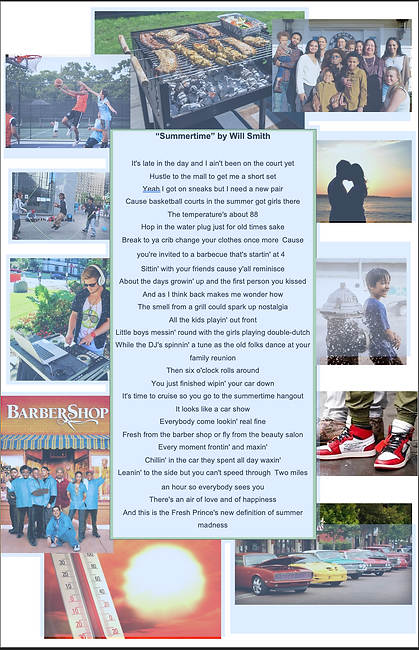
ASSIGNMENT - Song Lyrics Poster
Pick a song you really like and then take the lyrics and make a poster out of it using images that match the song. PLEASE make sure the song and pictures are "school appropriate", so no profanity or obscene images.
-
Create a folder in your "MASTER" folder and call it "Exploratory Projects". Using Microsoft Word, Google Draw or Adobe Photoshop, set up your document 11"X17".
-
Save your file: "J.Smith_Exploratory1"
-
It can be Horizontal or Vertical
-
Go to Google and search for your song and the lyrics
-
Find images on Google that match the lyrics of the song. Don't forget to save LARGE images.
-
Copy and paste the lyrics into your poster
-
Drag your images and begin to create your poster. Click on the poster on your right to see a large image of how you should lay your poster out.
-
You can use different types and colors that go along with the song.
-
Upload your poster to Schoology when you're done.
OPTION 2 - Create a Music Video From one of Your Favorite Songs
Using Youtube and QuickTime along with Google "Sample" extension, find a song that you like and create a music video with titles, transitions, and video clips. The length of the song will dictate the length of your video
Please keep your song "school appropriate" and try to find a clean version. Create a new folder in your "Master Folder" called Song Lyrics and then make an Assets folder to put your images and clips in. Make sure to upload the project to Schoology when complete.
ASSIGNMENT - Spooky Themes
The month of October is known for spooky concepts and ideas... It's a time for Scary stories, Spooky videos, and Ghoulish sounds!
The question is...how would you represent .... SPOOKY?
How or what you do is up to you... IDEAS:
-
Photo collage of Fall images (leaves, pumpkins) or spooky decorations
-
Makeup effects and costumes - take a pic of your original creation
-
Carve or paint a pumpkin
-
Scary sound recordings/effects
-
A spooky or scary song you made or a mashup of scary sounds and songs
-
A spine-tingling video clip or trailer
Use whatever equipment, software
Just remember it needs to be an original creation from you.
Also... Please keep it school appropriate.
After completing the project upload your creation to Schoology
and don't forget... Have fun!


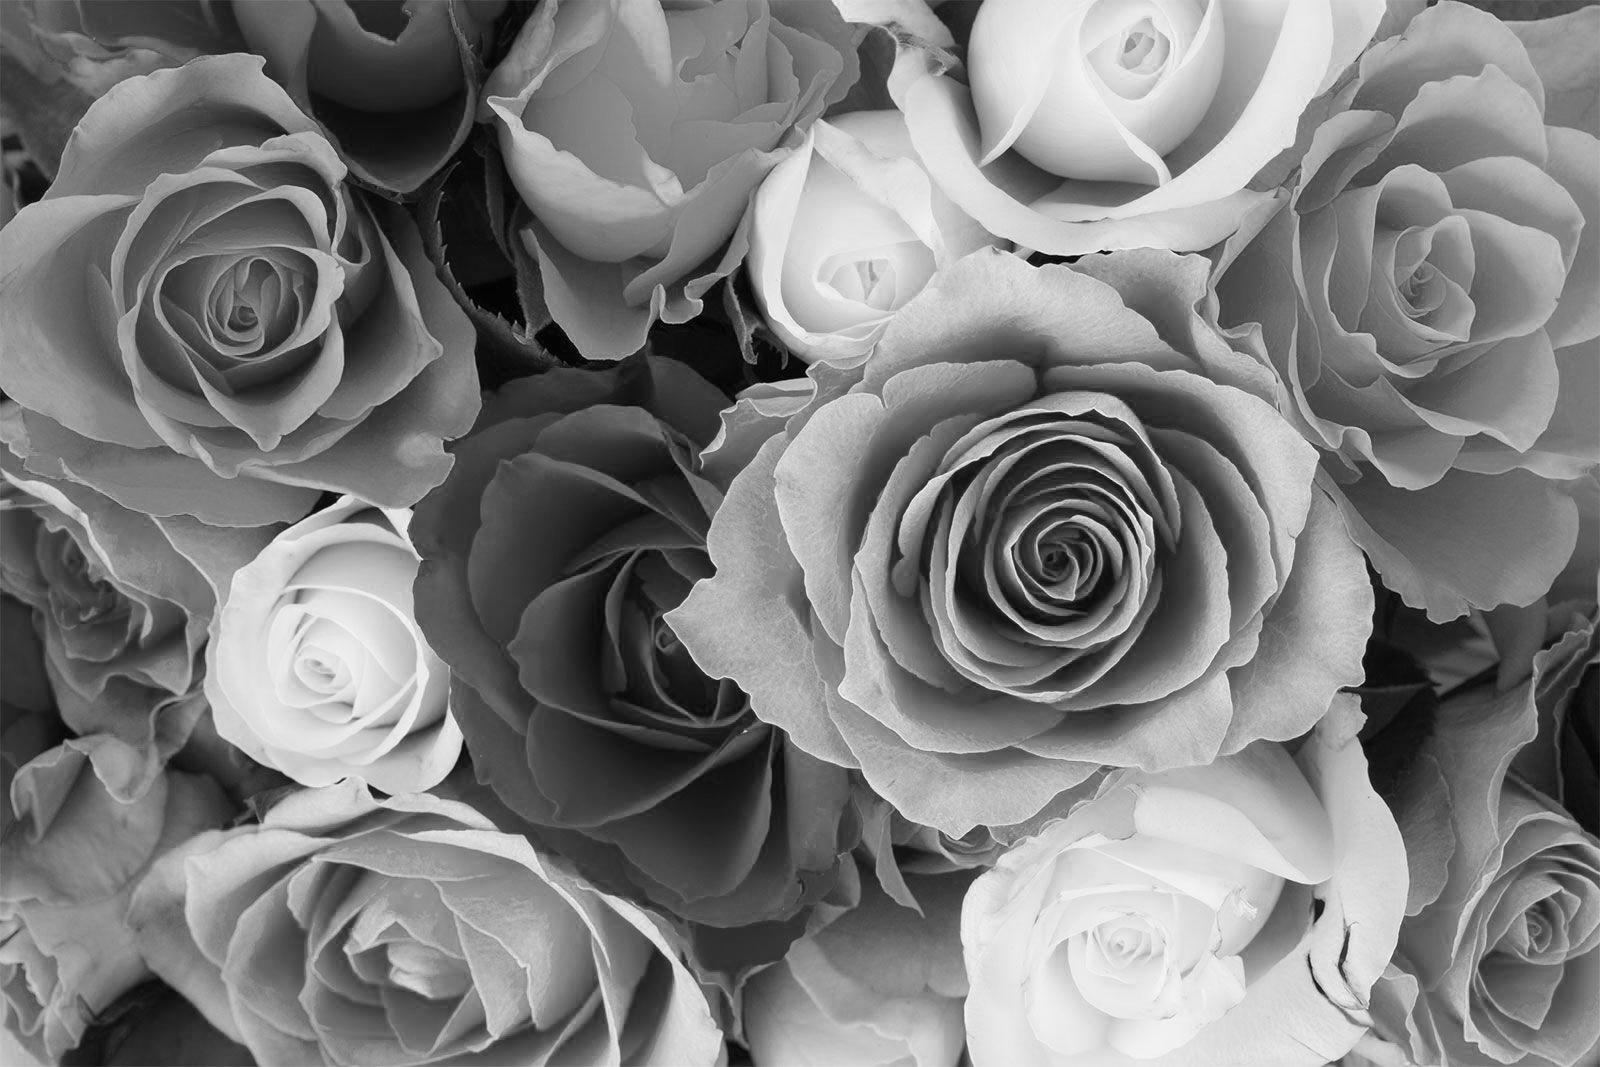
ASSIGNMENT - Photo Collage - Texture
When talking about photography texture refers to the visual quality of the surface of an object, revealed through variances in shape, tone, and color depth. Texture brings life and vibrance to images that would otherwise appear flat and uninspiring.
For this Assignment, use your Smartphone to photograph a variety of textures and create a photo collage. You must use a MINIMUM of 5 images for your collage. Some examples of texture can be:
-
soft
-
smooth
-
rough
-
sharp
-
jagged
-
shiny
-
Your collage can have different images of the same texture like 5 images that are all smooth
-
Or 5 images of different textures like smooth, sharp, rough, shiny, and sticky.
-
Most of your images should be photographed close up to show the texture, but can also be shot farther away.
-
You can use different lighting to enhance the texture - bright, dark, contrasty
Using the pic collage app of your choosing create a photo collage. Then upload to Schoology where the assignment is posted.


ASSIGNMENT - Photo Collage - About Me

Create a Photoshop collage of things that describe you and your interests. Create a new file in Photoshop of a size of 11"X17" with a resolution of 150 DPI. You must cut out all the items you chose using the selection tool(s) of your choice. You must include a minimum of 10 images. You can also include Photoshop filters and effects to enhance your images. Make sure to place each image on a separate layer and name each layer to keep things organized. You can take your own images (preferred) or you can find royalty-free images on Google. EVERY IMAGE NEEDS TO BE CUT OUT. DON'T JUST DRAG IMAGES OVER WITHOUT TRACING THEM OUT.
Create a new file in Photoshop of a size of 11X17" with a resolution of 150 DPI. Save the file as your last name and first initial + flower (ex: McCarthyF_about_me.psd). When you are finished, flatten the image and save it again as a JPEG with the same name (ex. McCarthyF_about_me.jpg).
When finished, please upload the JPEG to the Schoology Exploratory Assignment folder
ASSIGNMENT - Anti-Vaping Poster
INSTRUCTIONS
-
Posters should contain a clear message about the dangers of vaping/electronic smoking device usage or about the marketing of these products to youth. Choose a message that you think will resonate with your peers. Please do not include violent images in your poster such as guns, knives, bombs, or weapons.
-
Posters are to be made in Photoshop
-
You may use images from Google and cartoon Clipart to include in your design.
-
Your image must include a photo of a model. Work with another student in class for your idea.
-
Posters may not contain copyrighted images or characters from TV or cartoons.
-
Landscape or portrait orientation is acceptable.
-
YOU MUST INCLUDE a Fact or Statistic about Vaping. For example "1 in 3 teens between the ages of 13-17 have tried a Vape before" Please use credible sources, and list your source(s) on a label on the bottom of your poster.
Create a new file in Photoshop of a size of 11X17" with a resolution of 150 DPI. Save the file as your last name and first initial +antivape(ex: McCarthyF_antivape.psd). When you are finished, flatten the image and save it again as a JPEG with the same name (ex. McCarthyF_antivape.jpg).
When finished, please upload the JPEG to the Schoology Exploratory Assignment folder
POSTER EXAMPLES


HOW TO MAKE A "SMOKE EFFECT" FOR YOUR POSTER
ASSIGNMENT - Colorize Image
CLICK ON THE IMAGES IMAGES TO DOWNLOAD
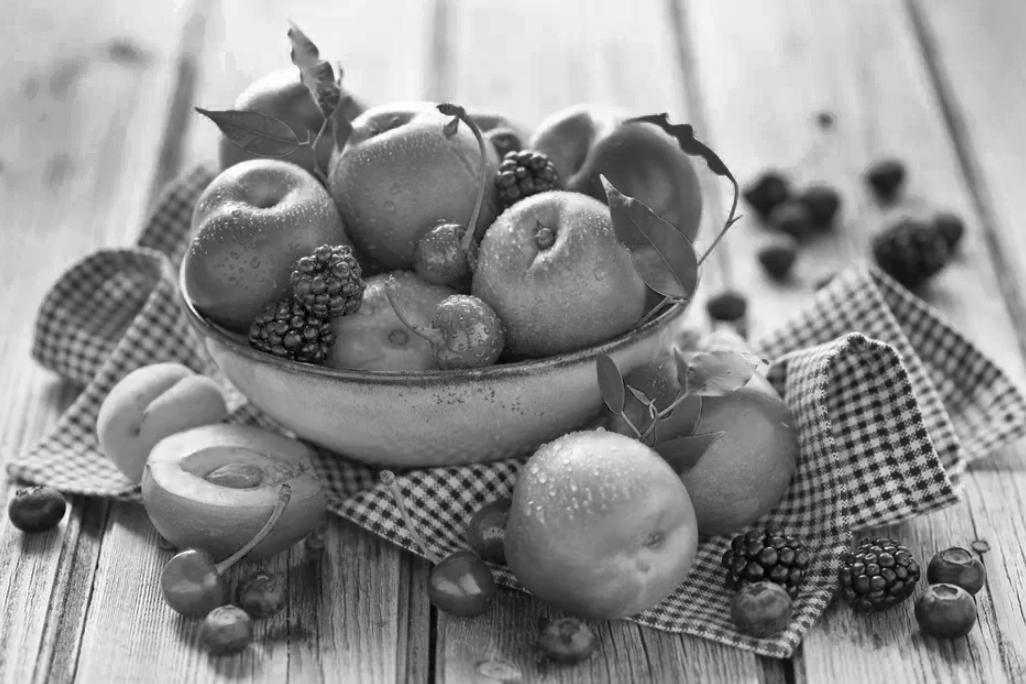
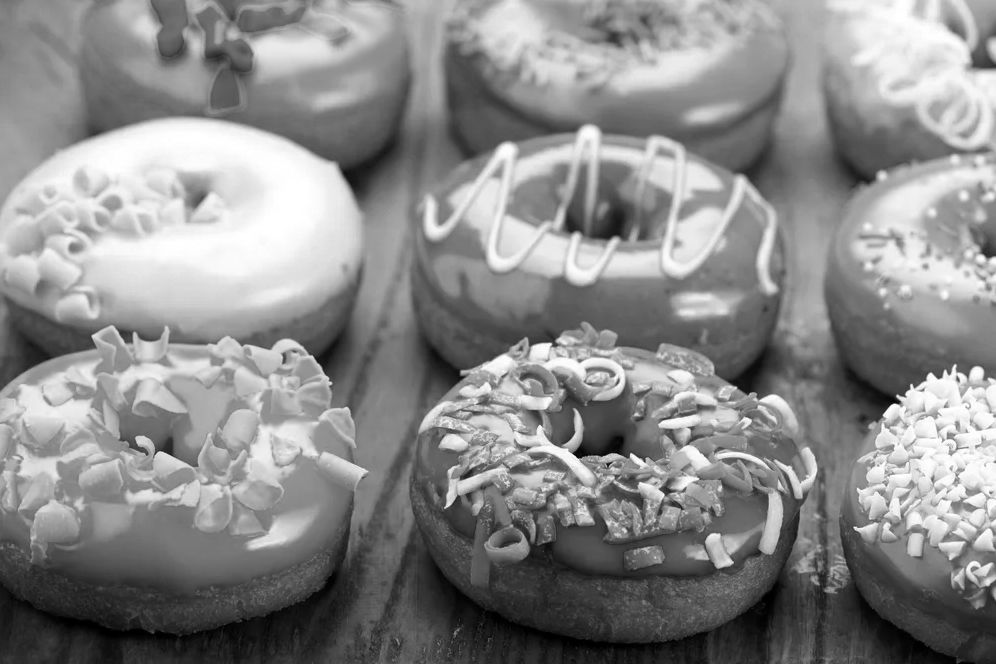
Change one of these images into a color image. Use what works for you. You can create layers and colorize them using selection tools and working with the airbrush, fill, and opacity tools. Below is a tutorial on how to colorize your image
IMPORTANT: EACH ITEM (donuts, fruit, flowers) NEEDS TO BE COLORIZED.
Create a new file in Photoshop of a size of 8X10 with a resolution of 150 DPI. Save the file as your last name and first initial + flower (ex: McCarthyF_flower.psd). When you are finished, flatten the image and save it again as a JPEG with the same name (ex. McCarthyF_.jpg).
When finished, please upload it to the Schoology Exploratory Assignment folder
ASSIGNMENT - Song Lyrics Video
-
Pick a song you really like and then take the lyrics and make a video out of it using images and video clips that match the song. Use any Video/Sound apps you prefer. Use Chrome Sample to get your song off of Youtube.
-
PLEASE make sure the song and pictures/video clips are "school appropriate", so no profanity or obscene images.
-
Your video should be a MINIMUM of 2 minutes
-
This is a continuation of your 1st Exploratory project - "Song Lyrics" poster. Please look at the assignment for information.

ASSIGNMENT - 5 Senses Collage
EXAMPLES


INSTRUCTIONS
Create a collage using your phone with photo collage apps, Adobe Photoshop, or Google images. You will need a minimum of 5 images (since there are 5 senses), using a model (friend or yourself), or pictures that relate to the 5 senses but you can use more. Upload to Schoology when you are done.
The Five Senses are
Taste
Touch
Sight
Smell
Sound
MODELS
When taking images for the senses think of the different ways you can shoot your model. You can exaggerate facial expressions, you can shoot using odd angles, close-ups, and you can use your lighting to enhance your model. Plan out your shoot first to figure out what look you want to go with. You may also use props (food, sounds, touching objects, etc).
OBJECTS
You can take pictures of objects or scenes that are related to the 5 senses that you can make a collage with. For example, a bite out of a sandwich, a pair of headphones on a table, a pair of glasses, an image with texture for the sense of touch. See the sample images to the right for examples
ASSIGNMENT - Surrealist Portrait Landscape
POINTS TO CONSIDER
What is your idea?
-
Start with a well-thought-out creative idea. Throwing two random things together doesn’t necessarily qualify as surreal.
-
Use QUALITY photographic images from magazines- not cartoons or illustrations.
-
Avoid images from popular cultures such as famous people, name brands, and retail products that will distract the viewer.
-
Consider background, middle ground, and foreground.
Ideas for your Surrealist Collage
-
change the normal scale of objects (ex: a car the size of a living room or bugs the size of people)
-
turn the accepted order of things upside down (ex: dogs walking people instead of people walking dogs)
-
mix internal and external space (ex: trees growing in a kitchen, seeing the inside and outside of an object at the same time)
-
transform one object into another (ex: a car turning into a fish, an animal turning into a person)
INSTRUCTIONS AND PHOTOSHOP EXAMPLES
PROJECT INSTRUCTIONS
-
Start by making a New Document. 11X15@ 150 DPI
-
Create a high-quality Photoshop Surrealist portrait with you as the focus of attention
-
You must take photos of yourself with the studio setups and place that picture into your portrait
-
Create an imaginary, dreamlike composition (see examples below)
-
Must include: Background + 5-7 objects (people, animals, props, trees, cars, etc….basically anything that you have to place in the image outside of type)
-
Filters and Adjustments
-
Upload your finished project to the assigned page on Schoology
-
Don't forget to review the rubric to make sure you are meeting all of the project requirements!


ASSIGNMENT - Photo Collage with Playlist
One of the first things we learn in the program is to think creatively, Whether you're at home or in the studio, you should always keep your creativity flowing. Taking photos is an easy way to explore your creative side.
1. The color blue will be the main inspiration for this assignment. first, go to your phone's respective app store and download the Schoology app and then download a pic collage app.
2. Take 6 pictures using your phone's camera featuring the color blue and stitch them together using the pic collage app of your choosing. Then upload to Schoology where the assignment is posted.

3. Once your photo collage is uploaded, put together a 5 song playlist using your preferred music playing platform that you feel represents and pairs well with the imagery of your collage. The songs should describe the images you took. Please include the link to your playable playlist with your collage when you upload it.

One of the first things we learn in the program is to think creatively, Whether you're at home or in the studio, you should always keep your creativity flowing. Taking photos is an easy way to explore your creative side.
1. For this assignment, use what you've learned about composition in photography from watching the provided tutorials and do a photo collage with the theme being "Fall Colors" Get outside and take some photos using the terms we've leaned like "worms and birds-eye point of view, foreground, focal point, symmetry, horizon line, etc." and take some pictures that make you think of the Fall season.
2. Take a minimum of 5 pictures using your phone's camera featuring Fall colors (yellows, reds, oranges, browns) and stitch them together using the pic collage app of your choosing. Then upload to Schoology where the assignment is posted.

***If you don't have access to a camera or Smartphone, please contact us for an alternate assignment.
ASSIGNMENT - Photo Collage - Fall Colors
ASSIGNMENT - Forms of Light
Without light, we wouldn't be able to take a picture or record a video. It's all around us in different forms, from natural to artificial in a variety of different colors and intensities
1. For this assignment, use what you've learned about composition in photography from watching the provided tutorials and do a photo collage with the theme being "Forms of Light"
2. Here are some examples to use as your subject matter
-
Flashlights
-
Lamps and ceiling lights
-
Smartphone
-
Holiday lights/string lights
-
Objects that light up - toys
3. Use these types of light to light other objects or take pictures of the objects themselves
4. Take a minimum of 5 pictures using your phone's camera featuring your images of light and stitch them together using the pic collage app of your choosing. Then upload to Schoology where the assignment is posted.


BRRRR!!! - It's cold out there! I don't know about you, but I actually like the winter and SNOW! To take advantage of the recent weather...
1. For this assignment, use what you've learned about composition in photography from watching the provided tutorials and do a photo collage with the theme being "COLD" Get outside or stay inside and take some photos using the terms we've leaned like "worms and birds-eye point of view, foreground, focal point, symmetry, horizon line, etc." and take some pictures of things that represent cold. Here are some examples:
-
Snow, ice, snowballs, snowman
-
things in your home - ice cubes - things in your freezer - foods - ice cream
-
Windows with fog/ice on them
-
Blankets, gloves, jackets, hats
-
Heaters or a fireplace
2. Take a minimum of 5 pictures using your phone's camera featuring Fall colors (yellows, reds, oranges, browns) and stitch them together using the pic collage app of your choosing. Then upload to Schoology where the assignment is posted.


ASSIGNMENT - Photo Collage - COLD!
ASSIGNMENT - Photo Journal - A Week in the Life
You may not think about it very often, but what do you do in a week? What do you do every hour, day, week? Do you have a routine? do you have things you do all the time? sports, hobbies?
1. For this assignment, use what you've learned about composition in photography from watching the provided tutorials and do a photo collage with the theme being "A Week in my Life"
2. Here are some examples to use as your subject matter:
-
hobbies
-
pics of you playing games
-
pics of you listening to music
-
eating your favorite meal
-
hanging with friends, family, pets
-
MAKE THE PHOTOS INTERESTING!
-
Set up the shot first. Ask others for help
-
Do a funny pose or use props
-
Take the pictures at interesting angles (pets or family member point of view)
-
I don't want to see boring stuff like doing homework unless you do it in a fun or cool way
3. Take a minimum of 5 pictures (1 for each day) using your phone's camera featuring your images of light and stitch them together using the pic collage app of your choosing. Then upload to Schoology where the assignment is posted.


ASSIGNMENT - The Five Senses

The Five Senses are: Taste, Touch, Sound, Smell, and Sight
1. For this assignment, use what you've learned about composition in photography from watching the provided tutorials and figure out how to depict each of The Five Senses (sight, smell, touch, taste, or hearing) in a photo collage. You will take a total of 5 photos-one of each sense.
2. In addition to including one of the five senses in each photo, you'll also want to remember the elements of composition and use at least one to enhance your photograph and draw attention to the subject.
3. Take 5 pictures using your phone's camera featuring the 5 Senses and stitch them together using the pic collage app of your choosing. Then upload to Schoology where the assignment is posted.
***If you don't have access to a camera or Smartphone, please contact us for an alternate assignment.


ASSIGNMENT - Patterns
A pattern is a repeated design. We are instinctively drawn to patterns, as they help us extract order from the chaos in the world around us. As a general rule, we love patterns so much that our brains create patterns where there are none at all.
Repetition refers to objects, shapes, forms, figures, or lines repeated in regular, consistent intervals. Think of repetition as the visual equivalent to a beat in music. Repetition of forms in an image is pleasing to the eye in much the same way that rhythm is pleasing to the ear in music. The eye tends to follow repetition, giving a sense of movement in the image.
Your assignment is to find patterns and repetition around you in your home. Use them in your images to create compelling compositions (just like music!). You must use a MINIMUM of 5 images for your collage.
-
Look Around! Pattern and repetition are everywhere. While you are at home this week search for strong graphic elements, shapes, lines, areas of contrast, or colors.
-
Emphasize Pattern. Fill the entire image with repeating elements or patterns to create a visual impact—from corner to corner, edge to edge. If the pattern or repeating visual elements are dominated by lines, try rotating the camera and viewfinder so that the lines create diagonals instead of a vertical or horizontal orientation.
-
Break It. Include a visual anomaly within the pattern to create a powerful focal point.
-
Use Perspective. Photograph repeating elements diminishing into the distance. This can be every bit as effective as leading lines or power shapes in creating a visual movement that helps move the viewer’s eye up and through the image in a dynamic way.
Stretch your creativity finding pattern and repetition while you are at home. Using the pic collage app of your choosing create a photo collage. Then upload to Schoology where the assignment is posted.


ASSIGNMENT - Everyday Sounds
An alarm going off, a dog barking, water pouring down the drain, riding your skateboard..... these are what you call "Everyday Sounds"
1. For this assignment, use what you've learned about composition in photography from watching the provided tutorials and do a photo collage with the theme being "Everyday Sounds" Get outside or stay inside and take some photos of the sounds you hear every day. Things to think about:
-
Write a list of your daily routine before you get started to think of the sounds you encounter every day.
-
How will you capture these sounds? will you need help or someone to create the sound for you?
-
WIll you need to take fast or slow pictures to capture the sound?
2. Take a minimum of 5 pictures using your phone's camera capturing these sounds and stitch them together using the pic collage app of your choosing. Then upload to Schoology where the assignment is posted.
***If you don't have access to a camera or Smartphone, please contact us for an alternate assignment.

One of the first things we learn in the program is to think creatively, Whether you're at home or in the studio, you should always keep your creativity flowing. Taking photos is an easy way to explore your creative side.
1. For this assignment, use what you've learned about composition in photography from watching the provided tutorials and do a photo collage with the theme being "The Color Green" Get outside and take some photos using the terms we've learned like "worms and birds-eye point of view, foreground, focal point, symmetry, horizon line, etc." and take some pictures that make you think of the Spring.
If you can't get outside, there's plenty of things around the house you can take photos of. See the example in the collage on the right. If you spend some time and look around, there's probably plenty of things to choose from.
2. Take a minimum of 5 pictures using your phone's camera featuring the color green and stitch them together using the pic collage app of your choosing. Then upload to Schoology where the assignment is posted.

ASSIGNMENT - Photo Collage - The Color Green
ASSIGNMENT - Close-Up
There's a whole other world around us that we see every day from far away. Close-up photographs can change an ordinary subject into an abstract, more interesting composition when taking your images.
1. For this assignment, use what you've learned about composition in photography from watching the provided tutorials and do a photo collage with the theme being "CLose-Up"
Get outside or stay inside and take some photos of everyday items and shoot them as close as you can with your Smartphone or camera. Remember, you don't always have to get physically close, if your device has a zoom, use it to take your pictures up close.
2. Take a minimum of 5 pictures using your phone's camera capturing these sounds and stitch them together using the pic collage app of your choosing. Then upload to Schoology where the assignment is posted.

PICTURE LETTERS PROJECT

Using the layer mask technique in Photoshop is often used for placing part of an image inside a particular selection on your canvas. A good example of this is fitting pictures inside letters of a word or phrase.
In this project, you will get a collection of pictures from the Internet that represent who you are. We will practice using the layer mask technique by placing each of your images inside each letter of your first name. Start by creating a new document in Photoshop that is 1000 pixels wide and 250 pixels tall at 150DPI resolution. Use the text tool ( T )to type your name, then Layer>Rasterize>Type, then place a new image inside each letter using selection tools and masks. Be sure to maneuver the layer mask and picture so that the image is easily distinguishable and interesting. Add a Layer Style to the text to make it stand out and add a background behind the text that relates.
Search on Google to find a black & white picture of your choice. Make sure to select “Search Tools>Size>Large” to find the best quality image Use selection and Quick Mask tools in Photoshop to color a few particular areas of the photo to add interest and bring life to the scene. Be sure to be very precise with your selection and coloring! Save the file with your last name and first initial + space (ex: McCarthyF_space.psd). When you are finished, flatten the image and save it again as a JPEG with the same name (ex: McCarthyF_space.jpg).
If you want to try something different, there is an alternative method for doing this project using Clipping Masks:
When finished, please upload it to the Schoology Exploratory Assignment folder
GRADIENT LAYER MASK PROJECT

GRADIENT MASK TUTORIAL
You have been hired as a graphic designer by Showcase Advertising Agency. They want to create two advertisements for upcoming events.
Use the directions from the Gradient Mask tutorials below that demonstrates how to use gradients with a layer mask to create 2 advertising ads of different events of your choice. Create a new document 1024 pixels wide and 768 high in size at 150DPI. Find 3 images that relate to your event topic. Decide which image will be your background and move it onto the new document. Then move the other 2 images onto the background and blend the 3 images together using layer masks with gradient. Remember to be careful not to show the edges of the other images. Then create the transparency on the white title bar at the bottom and add an original catchy slogan to go with your ad. Use dafont.com to find a font that fits your target audience.
Search on Google to find a black & white picture of your choice. Make sure to select “Search Tools>Size>Large” to find the best quality image Use selection and Quick Mask tools in Photoshop to color a few particular areas of the photo to add interest and bring life to the scene. Be sure to be very precise with your selection and coloring! Save the file as your last name first initial + space (ex: McCarthyF_space.psd). When you are finished, flatten the image and save it again as a JPEG with the same name (ex: McCarthyF_space.jpg).
How to combine photos in Photoshop with Layer Masks, seamless blending technique:
https://www.youtube.com/watch?v=iA4SIF0KsDc
https://www.youtube.com/watch?v=MxC45bv6YJY
When finished, please upload it to the Schoology Exploratory Assignment folder
STUDIO PORTRAIT PROJECT
Soft Edge tutorial - Download File Tarp tutorial - Download File
Professional photographers use a tarp or a background behind their subject when taking portraits of people or objects. There is a way to simulate this effect in Photoshop. There are two tutorials that will visually walk you through how to make a soft edge studio background and a tarp studio background.
* Make a new file with a size of 480 height x 640 width pixels, at 72 resolution.
* For the soft edge background choose any 2 colors of your choice.
* For the tarp background, the 2 colors must be black and white.
* Take a different pose picture of yourself using Photobooth for each background.
* Drag your photos of yourself from Photobooth to the desktop and then you can open them in Photoshop.
* Open the pictures of yourself and use the selection tools and layer masks to cut yourself out and place in the two backgrounds. You must use a different picture of yourself for each portrait.
* Remember to clean up all edges nice and smooth. Use Transform if you need to resize yourself in the background to look better (you do not want to have too much headspace between the top of the image and your head, make sure there is not a floating body, your body cut off point must be at the bottom of the portrait).
* Once you have created your portrait, add text of your first name and last name somewhere on the image. Add a layer style to your text (ex. bevel and emboss, or outer glow, etc).
As you work, save your project as a .psd and name it lastname + first initial +softedge.psd (will be tarp.psd for the second studio background). When you are finished, save it again as a JPEG with the same name (ex: McCarthyF_softedge.jpg)
When finished, please upload it to the Schoology Exploratory Assignment folder


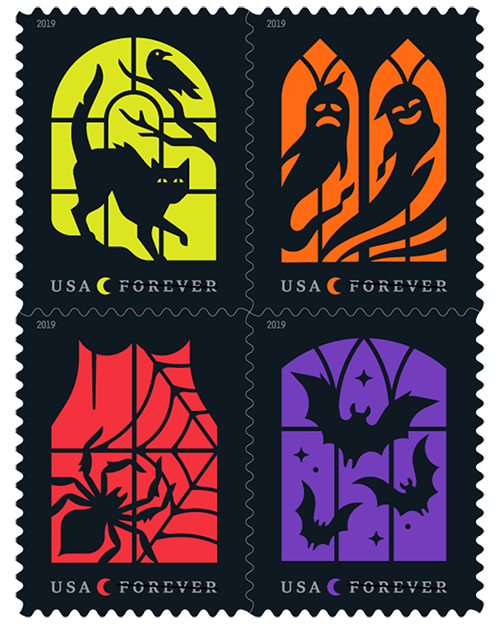
POSTAGE STAMP PROJECT
Postal Stamps have marked American history through various designs over the years. Create a series of stamps based on a common theme (ex Sponge Bob).
Create a new file 174 x 200 pixels in Photoshop. All your stamps must have a common theme (if you choose cars, you must use cars for all your stamps, but you can use different types of cars). Make sure all stamps have a similar look. Make sure all cut out image edges are clean and smooth. Remember to add the price of the stamp (45 cents) and the letters USA to the stamp. Use Arial Black for the stamp price and USA lettering. Create 6 total stamps. Save the file as last name + first initial + stamp1, (stamp2, stamp3, etc.).
As you work, save your project as a .psd and name it lastname + first initial +stamp1.psd (stamp2, stamp3, etc). When you are finished, save it again as a JPEG with the same name (ex: McCarthyF_stamp1.jpg)
When finished, please upload it to the Schoology Exploratory Assignment folder


VSMP BANNER PROJECT

Banners are used by the professional world to showcase or display company information. Banners can be printed or on-line like those found on websites. You are going to create a web banner for Digital Media.
Create a new file 400 x 150 pixels. You are going to create a logo banner for our VSMP program. Find at least 20 images on-line that represent what digital media is and what this class is about. Use Layer Masks, pen tool, etc., to cut out each image.
Combine these images on a background that you create using Filters in Photoshop to represent digital media. Finish the banner off by adding the text – Video, Sound, & Music Production – in the font choice that you think best fits. Experiment with powerful and impactful fonts. Add layer styles to the text and to the images to make them stand out.
As you work, save your project as a .psd and name it lastname + first initial +banner.psd. When you are finished, save it again as a JPEG with the same name (ex: McCarthyF_wbanner.jpg)
When finished, please upload it to the Schoology Exploratory Assignment folder
GRAFFITI WALL PROJECT

Graffiti can be found on walls and buildings throughout America. Sometimes it is an act of defacing property, but other times it is an art form. You are going to use THIS TUTORIAL WEBLINK to the right to complete the tutorial for creating graffiti on a wall.
A few things different from the tutorial are the following:
1-Must find a wall that is at an angle to put the graffiti on
2-Text must be colored (use dafont.com to come up with cool fonts)
3-Must have a least 5 different graffiti words (different fonts for each)
4-Must rasterize the type before you change perspective (Layer>Type>Rasterize)
5-Use distort with perspective under transform to get to look more realistic on the wall
6-Change the blending mode to overlay, and adjust opacity as well to make it more realistic
When finished, please upload it to the Schoology
PUBLIC SERVICE ANNOUNCEMENT (PSA) PROJECT
PSA VOICE OVER DOWNLOAD FILE
PSA SCRIPT DOWNLOAD FILE
Public Service Announcements (PSA's) are messages used in the media to promote awareness or to educate the public. These typically focus on health or safety or some type of social issue. Some common ones you have seen have to do with the don't text and drive commercials or they don't do drugs ad campaigns.
You have been hired as an audio editor for Commercials Incorporated. They want you to edit a PSA for your local high school to raise awareness about local clubs and activities for students. They have provided you with the voice-over (VO) and the final script. In this project, you will edit a raw voice recording to match a script. Cut and splice clips in GarageBand, arrange the recording in the correct order. When you have matched the script, add at least two supporting sound effects and background music to make the product appealing and persuasive. Remember the background music should fit your target audience and not overpower the voice-over.
As you work, save your project as a GarageBand project file (.BAND) and name it last name +first initial + PSA. When you are finished, export it using Share>Export Song to Disk menu and choose the .MP3 encoder, and name the output file the same name (ex: McCarthyF_PSA.MP3).
When finished, please upload it to the Schoology Exploratory Assignment folder

PHOTO SKETCH PROJECT
PHOTO INTO SKETCH TUTORIAL
You are going to turn a photo collage into a sketch. You will create 2 different sketches. Find 3 similar images by topic of your choice online (ex. 3 basketball players or 3 cars, etc). Create a new file at 720 x 480 pixels and fill it with white. Combine the 3 images into the new image by cutting out to keep what you want and placing them on the white background. Use the Adobe Filter Gallery to turn a photo into a sketch. Once your sketch effect is applied, use the burn tool to add to any places that need to be darker. Finally, add some text of a color that relates to your subject and add layer style effects to the text. Use dafont.com to get a good font type that fits.
As you work, save your project as a .psd and name it last name + first initial + sketch1, last name + first initial + sketch2. When you are finished, save it again as a JPEG with the same name (ex: McCarthyF_sketch1.jpg, pettywsketch2.jpg)
When finished, please upload it to the Schoology Exploratory Assignment folder


LICENSE PLATE PROJECT
LICENSE PLATE TUTORIAL
MISTRAL FONT
LICENSE PLATE FONT
You are going to create a California license plate from scratch. Create a new file at 540 x 300 pixels and follow the tutorial on how to produce this effect. Download and load the fonts need for this project from the files on the right.
You choose what the text (letters and/or numbers) will read on your license tag. Nothing "inappropriate".
As you work, save your project as a .psd and name it lastname + first initial +license.psd. When you are finished, save it again as a JPEG with the same name (ex: McCarthyF_license.jpg).
When finished, please upload it to the Schoology Exploratory Assignment folder
PHOTO COLLAGE - Pick a Composition Word
1. For this assignment, use what you've learned about composition in photography from watching the provided tutorials and do a photo collage with the therm picking ONE of these words:
-
Symmetry
-
Focal Point
-
Worm's Eye
-
Contrast
-
Horizon Line
2. Take a minimum of 5 pictures using your phone's camera featuring this word and stitch them together using the pic collage app of your choosing. Then upload to Schoology where the assignment is posted.
As you work, save your project as a .psd and name it lastname + first initial +license.psd. When you are finished, save it again as a JPEG with the same name (ex: McCarthyF_license.jpg).
When finished, please upload it to the Schoology Exploratory Assignment folder

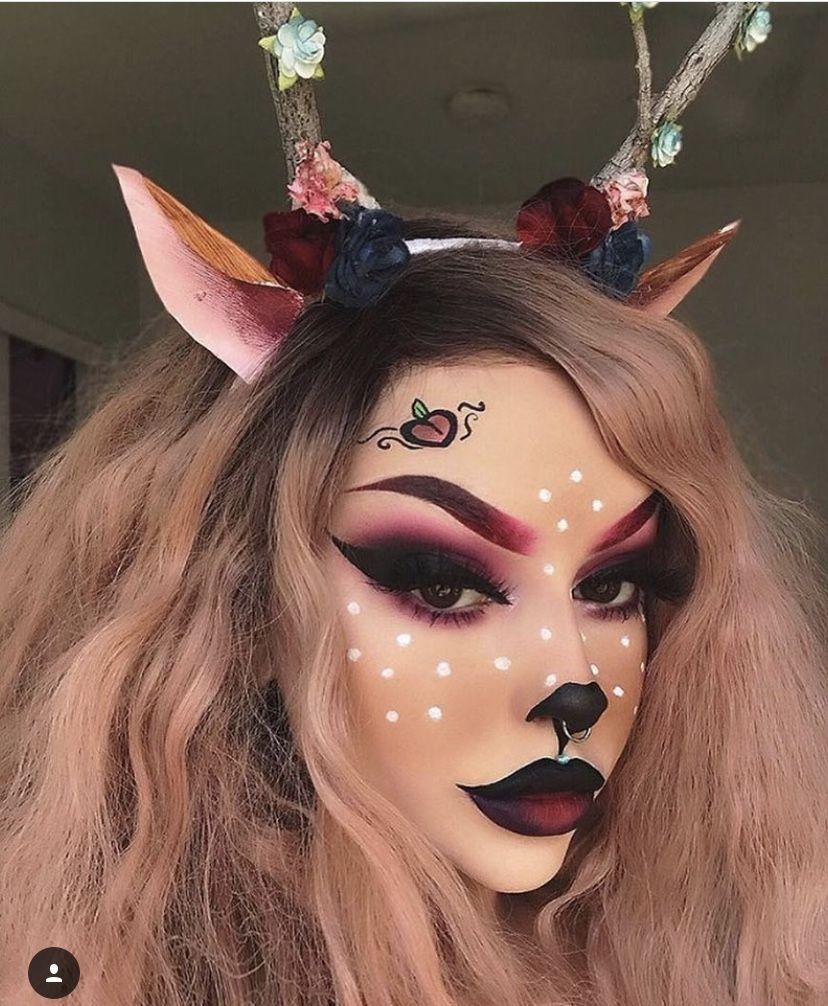
OTHER EXTRA PROJECTS
You can select any of the following as extra credit or closing semester projects. Feel free to use any pictures and images that are school appropriate for these projects and not just the ones in the tutorials.
Pixel Characters
Double Exposure Effect
Fantasy Flaming Deer
Glitch Photo Effect
Album Artwork
(Use a profile image of yourself or find one and a hat and texture online.)
Book Design
(Create your own book title and logo, using these techniques, put on this white and black covers)
As you work, save your project as a .psd and name it lastname + first initial +(name of tutorial).psd. When you are finished, save it again as a JPEG with the same name (ex: McCarthyF_"projectname".jpg).
When finished, please upload it to the Schoology Exploratory Assignment folder
